Can You Paint Stucco?

Posted on: August 19th, 2022

Can You Paint Stucco?

Because stucco is a porous surface made of cement, people often wonder, ”Can you paint stucco?” While you most definitely can paint stucco, there are certain paints you’ll want to avoid using and other things to consider. Choosing the right kind of paint will prevent blistering and peeling as well as prevent moisture from penetrating the material and causing damage. So let’s learn the ins and outs of painting stucco, what paint works best, as well as popular stucco color choices to consider. 

How Long Does Paint Last?

What is Stucco? 

Stucco is the thin, finish coat that goes on the outermost layer of homes or commercial business buildings. Many people think that stucco is the same thing as concrete. While concrete is made of water, cement, and sand, stucco also contains lime in the mix. Modern stucco has added polymers and other added agents that help improve its resilience and flexibility. One really nice thing about stucco is that once dry, it’s a very breathable surface. This allows for moisture to pass through or evaporate from behind which helps avoid damage and rot. 

How to Paint Stucco? 

When your stucco exterior starts to look dingy and run down, it may need more than a quick spray down with the hose. Homeowners can tend to shy away from attempting to repaint stucco but given the proper steps to follow, you should feel confident tackling this project. If you want to achieve professional-looking results, follow these steps on how to paint stucco:

Step 1 

Start by cleaning the surface area of any dust or grime. Apply an appropriate cleaner. Go over the surface with a stiff brush to clean the deeply grooved exterior. If done properly, a power washer may be used. Allow your stucco to dry for at least 24 hours before you begin painting. 

Step 2 

Thoroughly inspect your stucco. Be sure you fill in any small cracks in your stucco with masonry caulk. Remove any loose stucco with a putty knife and repair it with stucco patching compound. 

Step 3

Using a napped roller, apply an acrylic primer to your stucco. Cut in the corners with a synthetic paint brush. Acrylic primers are a good choice because they adhere well to the uneven, rough finish of the stucco. You may want to apply two coats for the best coverage. Just be cautious to allow enough drying time between coats to prevent the primer from dripping. 

Step 4 

Apply paint as you did the primer. It’s helpful to note that due to the texture of stucco, you’ll need more paint per square foot than normal. Plan on needing twice as much paint for full coverage of stucco. One coat may be sufficient if the surface has been primed well. Use your own judgment. If applying a second coat, follow the manufacturer guidelines for ample drying times. 

How Long Should You Wait Between Coats Of Paint?

Best Stucco Paints 

The amount of exterior paints on the market these days are endless. So many choices can be totally overwhelming. However, when it comes to painting stucco, there are really only two choices: acrylic latex or elastomeric paint. 

  • Acrylic Paint 

About 80% of the time you will want to go with acrylic latex exterior paint. This paint is likely your best option. It’s flexible, durable, and allows the stucco to breathe. They are also known for being easy to apply as well as low maintenance to clean up. Last but not least, acrylic paint is affordable which is always an added bonus. 

  • Elastomeric Paint 

It may be a good idea to speak to your neighbors that have painted their stucco exteriors with success. If they used elastomeric paint and were pleased with the finished product, it may be a good choice for your home. Known for its longevity and protective qualities, it has the potential to last 4-6 years longer than acrylic paint. Keep in mind that because of its thick nature, elastomeric paint does not breathe well which can lead to trapped moisture and rotting under the surface. 

Best Stucco Paint Colors 

Colors with a high light reflective value (LRV) are generally the best colors for exterior stucco. They reflect more UltraViolet radiation away from the paint’s surface, protecting the pigment which preserves color. This would include colors such as sandstone, gray, white, off-white, pink, peach, and tan. Rust, brown, and yellow are also popular colors for exterior stucco.

Can You Paint Stucco Conclusion 

When you want to update your exterior stucco and give it a fresh new look, painting is certainly an option. If you live in the Sacramento area and would prefer to turn the job over to professionals, PaintRite Pros has you covered. 

If you’re searching for the best exterior painting service near Sacramento, you can rest assured that no one fits that description better than our team here at PaintRite Pros. We serve the entire Sacramento area including Dixon, Roseville, and Stockton. Click the button below to schedule your free estimate. 

What Is The Best Temperature To Paint Outside?

Free Estimate

Should You Caulk Before or After Painting?

Posted on: July 27th, 2022

Should You Caulk Before or After Painting?

Caulking is an important step in painting, but it’s often overlooked. Many people don’t know whether they should caulk before or after painting. In this blog post, we’ll explore the benefits of caulking and teach you how to do it like a pro.

Do You Paint Walls or Trim First?

Get Free Estimate

Should you caulk before or after painting?

Anyone who has tackled a home improvement project knows that there are a lot of little details that need to be taken care of. One question that often comes up is whether caulk should be applied before or after painting. The answer may surprise you, but there is no one-size-fits-all answer to this question.

In general, caulk should be applied before painting if the caulk line will be visible once the paint job is complete. This includes caulk lines around windows, doors, and baseboards. On the other hand, caulk can be applied after painting if the caulk line will be hidden by trim or molding. So, the next time you’re getting ready to tackle a painting project, take a moment to consider whether caulk should go before or after the paint.

Why is caulking important?

Caulking is an important part of home maintenance, as it helps to seal gaps and cracks that can allow water and air to enter your home. By filling these cracks and gaps, caulk prevents moisture damage to your walls and floors, as well as reduced energy efficiency due to drafts. In addition, caulk can also help to prevent pests from entering your home through small openings.

Applying caulk is relatively simple and can be done with a caulk gun and caulk tube. However, it is important to choose the right type of caulk for the job, as there are different formulations for different applications. For example, silicone caulk is often used in bathrooms and kitchens, as it is waterproof and mold-resistant. Once you have selected the right caulk, follow the instructions on the package for the best results. Properly applied caulk can make a big difference in your home’s comfort and durability.

Resilience vs Duration vs SuperPaint

How to choose the right caulk for your project

The caulk you choose for your next project should be based on the material you’re caulking, the surface you’re caulking on, and the paint you’ll be using. If you’re working with wood, for example, you’ll need a different caulk than if you’re working with concrete.

Similarly, if you’re painting over the caulk, you’ll need to choose a caulk that’s compatible with your paint. To get started, take a look at the surface you’re working with and the materials you’ll be using. This will help you narrow down your options and choose the right caulk for the job.

How to caulk trim

Caulking is an important part of any painting project, as it helps to create a seamless finish and prevent paint from chipping or flaking. When caulk trim, always start by caulking the joints between the trim and the wall. If there are any cracks or gaps in the trim itself, fill them in with caulk as well.

Once the joints and cracks are filled, caulk the perimeter of the trim. Finally, caulk any areas where the trim meets another piece of trim or another type of surface. Once you’re finished caulking, smooth out the caulk with your finger or a putty knife, and then allow it to dry completely before painting. following these simple steps will help you achieve a beautiful and professional-looking paint job.

How to caulk baseboards

Applying caulk to baseboards is a simple way to create a finished look and prevent drafts. Start by cleaning the area where the caulk will be applied with a mild soap and water solution. Next, cut the tip of the caulk tube at a 45-degree angle, and puncture the inner seal with a nail or wire.

For the best results, use a caulk gun to apply the caulk in a smooth, uninterrupted line. Once the caulk is in place, use your finger or a putty knife to smooth it out. Finally, allow the caulk to dry for 24 hours before painting or staining. By following these simple steps, you can easily caulk your baseboards like a pro.

How Much Does A Gallon Of Paint Cover?

How long does caulk take to dry?

How long the caulk takes to dry depends on the type of caulk, the environment, and how thick the caulk is applied. Most caulk will be touch dry within an hour, but it can take up to 24 hours for the caulk to cure completely. If you need to caulk a large area or if the caulk is being applied in a humid environment, it might take longer for the caulk to dry.

You can speed up the drying process by using a hair dryer or by opening a window to improve airflow. In general, though, you should expect caulk to take at least an hour to dry.

How to remove old caulk and start fresh

Over time, caulk can become dry, cracked, and discolored, making it an eyesore in an otherwise well-maintained home. If you’re planning to update your caulk, the first step is to remove the old caulk. Here are the steps you need to take to remove old caulk and start fresh:

  1. First, use a utility knife or caulk remover tool to score the caulk line. This will help the new caulk adhere better.
  2. Next, use a putty knife or similar tool to pry the old caulk up. Start at one end and work your way along the line.
  3. Once the old caulk is removed, use a vacuum or damp cloth to clean up any debris.
  4. Finally, apply new caulk following the manufacturer’s instructions. Be sure to smooth it down with your finger so that it forms a seal.

By taking these steps, you can ensure that your surfaces are properly sealed and protected from water damage.

Exterior caulking

While caulk is most commonly associated with interior applications, it can also be very useful for exterior projects. Exterior caulk is typically made from silicone or polyurethane, and it is available in a variety of colors to match the surrounding materials. Applying caulk to the exterior of a home is a relatively simple process, but it requires some care and attention to detail.

First, the area to be caulked should be clean and dry. Next, the caulk should be applied evenly to the crack or joint, using a caulk gun or putty knife. Finally, the caulk should be smoothed with a wet finger or sponge before it dries. While exterior caulking is not a difficult task, it can make a big difference in the appearance of a home and the protection it receives from the elements.

Should You Caulk Before or After Painting Conclusion

Caulking is an important part of painting and home maintenance, but it can be a bit tricky to know when and how to apply it. In general, caulk should be applied before painting, and it should be allowed to dry for at least an hour before any paint or stain is applied.

If you need help caulking your home in Sacramento, the professionals at PaintRite Pros can get the job done quickly and efficiently. We have a wide range of colors and types of caulk to choose from, so we can match any aesthetic. Whether you live in Elk Grove, Dixon, Roseville, or El Dorado County, we serve your town and can help you! Contact us today for a free quote! We also speak Spanish! If you need a Sacramento general contractor, we can refer you to some great companies as well. 

Best Paint Supply Store For DIY Projects

Get Free Estimate

Do You Paint Walls or Trim First? 

Posted on: July 15th, 2022

Do You Paint Walls or Trim First?

People often wonder what the best order is to go in when painting a room. Do you paint walls or trim first? From a professional point of view, with interior painting, it makes the most sense to paint your trim first, then ceilings, and then your walls. It’s much easier and faster to tape off trim than to tape off your walls. And you definitely don’t want the hassle of taping them both. With this system, you don’t have to worry about neatly painting your trim because any paint that gets on the ceiling or walls will be painted over. Just be sure to get a smooth finish on the trim. It’s important to let your trim dry for a full 24 hours before moving onto the ceiling. 

If you live in the Sacramento area and need help painting your house, we can help! Click the button below to get your free painting estimate!

Best Paint Stores in Sacramento

Get Free Estimate

How to Paint a Room Step by Step 

Before you start any painting project, gather all the supplies you’ll need. This makes the job run smoother and you won’t have to waste time running to the hardware store. Here is a list of items we recommend compiling before you start painting: 

  • 2 ½ in angled brush for trim and cutting in 
  • Painter’s tape 
  • Ceiling paint 
  • Baseboard and trim paint 
  • Drop Cloth 
  • ⅜ in nap roller, frame, and paint tray 
  • Stir sticks 

With all your paint and supplies ready to go, you’re all set to move forward with your project. 

  1. Choose Wall Color and Sheen 

Choosing the desired paint color can either be really exciting or extremely daunting. So many options can be overwhelming. We recommend you head to your paint center and have them mix samples for you of your 3 favorite colors. Once home, apply these samples on different parts of the room to get a feel for the one you light best. Keep in mind different lighting in the room at different times of the day will change the color drastically. When it comes to choosing a finish or sheen, it will mainly depend on what type of room you’re painting. Bathrooms and kitchens do well with a semi-gloss finish as they are durable and helpful in areas that need to be cleaned regularly. A satin finish has a little shine to it and is extremely versatile for bedrooms and other living spaces. High Gloss is the best choice for your trim, cabinets, and doors. 

  1. Prep Walls 

Before getting started, it’s a good idea to wash your walls and trim. This gets rid of any dust or residue that could clump when you paint. Next, check your walls for any nail holes, dings, and dents. Fill them in with putty, let dry, and lightly sand. Always apply a coat of primer over patched areas. Finally, remove the outlet and light switch covers. 

  1. Protect Your Walls and Furniture 

You’ll want to spread a drop cloth on the floor and over any furniture in the room where you’ll be painting. Fabric drop cloths are ideal but the plastic ones are inexpensive and can still do the trick. 

  1. Paint the Trim and Baseboards 

In most cases, we recommend painting your trim before your walls. Let the paint dry, then tape off the trim and move on to the walls. Using high-quality semi-gloss paint will protect the wood as well as leave a pleasing shine to your trim and baseboards. 

  1. Paint the Ceiling 

Painting your ceiling before your walls will avoid paint splatters on your wall. Paint the edge of the ceiling along the perimeter of the whole room with a 2 ½ in. angled brush. This process is called “cutting in”. Then use your ⅜” nap roller to paint the ceiling from one end to the other. Roll the paint in the same direction. If it needs a second coat, roll the paint in the opposite direction as the first coat. 

  1. Cut in the Walls 

It’s a smart idea to cut in one room at a time. Then, immediately roll out the wall while the cut-in paint is still wet. This step eliminates an obvious line where different brushes were used. Paint along the edges of trim and baseboards as well as the entire perimeter of the ceiling. 

  1. Roll On Wall Paint 

After opening your paint, be sure to stir it thoroughly with a stir stick. Fill your roller tray half full with paint. Load your roller and paint away from the baseboards in the direction of the ceiling. Roll straight back down to ensure the wall is covered. Overlap each stroke along the edge to avoid lap marks.

If you need to take a break but aren’t finished with your brushes yet, don’t waste paint and time washing them just yet. Simply place your roller or brush inside a ziplock bag and seal. This will prevent the paint from drying out and give you time to eat dinner or run an errand without all the unnecessary clean-up. When you’re ready to start up again, pull them out of their bags and they are ready to go. 

  1. Remove Tape and Clean Up 

Once your paint is nearly dry, remove the painter’s tape from the trim and baseboards. Score the edge of the tape where it meets the wall. This can be done with a flexible putty knife and facilitates a nice, clean edge. Be sure to thoroughly clean your paint brushes with soap and water immediately after use. Wait too long and the dried paint can be very difficult to remove. After the paint is completely dry and no longer tacky, replace all outlets and switch covers. 

How to Use Black Ceiling Paint

How to Paint Trim After Walls are Painted 

If you choose to paint your trim after your wall, start with prep work. Wipe down all trim and baseboards with a damp rag to remove any dust or dirt. It may take a little time but use painter’s tape around all trim and baseboards to avoid getting paint on your floor or walls. This also ensures a crisp, clean paint line when the tape is removed. Using an angled trim brush, apply your first coat of paint. After it has completely dried, add another coat. You’ll want to wait to remove the tape until the paint has had a good amount of time to dry but isn’t fully dry yet. Leave the tape on too long and it could compromise the old or new paint and you won’t be happy with the result. 

How to Paint Walls 

When it comes to painting your walls, there are a few tricks that will make a more cohesive, finished product. When painting areas next to the trim or corners with a paintbrush, the texture will be noticeably different than the portions painted with a roller. For the best results, after you brush on the paint, immediately roll out the same areas before the paint has a chance to dry. You can find a 3 in. roller at any big box or paint store. Just be certain the nap and thickness of both rollers used are the same. Do this section by section so it all looks uniform in the end and no part is forgotten.

It can be very frustrating to avoid lap marks on your walls when painting. Most people don’t know that they can avoid these uneven marks by keeping a wet edge at all times. This means that instead of painting in the familiar “W” pattern, you make sure each stroke of your roller overlaps the one before it while running the roller the full height of the wall. The unsightly marks appear when painting over sections that are already partially dry. Feather out your paint on large areas like ceilings where you can’t keep a wet edge to minimize lap marks. These techniques will also avoid you having to apply multiple coats of paint to get the uniform look you want.

Where to Purchase Paint Supplies in Elk Grove-Sacramento

There are several great options in the Elk Grove-Sacramento area to purchase paint and paint supplies. Here are a few that offer excellent quality products along with all the tools and materials you need.

Sherwin-Williams Paint Store-Elk Grove 

9716 Elk Grove Florin Rd. 

Elk Grove, CA 95624 

916-686-6034 

Behr Paint Store-Elk Grove 

9150 W. Stockton Blvd. 

Elk Grove, CA 95758 

916-478-2388 

Do You Paint Walls or Trim First Conclusion 

Depending on who you talk to, you might get different answers to whether you should paint your walls or trim first. However, over our years of experience we have found what process works and we stick by painting trim first, ceilings, then walls. 

If you have a painting project in your future or just have questions, give PaintRite Pros a call. We have years of experience painting homes in the Sacramento-Elk Grove area including, Stockton, Roseville, El Dorado County, and more! We’ll gladly help in any way we can. 

Can You Paint Apartment Walls in California?

Get Free Estimate

Brick Stain Colors for Exteriors and Interiors

Posted on: June 10th, 2022

Best Brick Stain Colors

Brick is a trendy yet classic choice for countless homes’ exterior. But when your brick starts to look dingy or outdated, how do you know what your options are to spruce things up? In this article, we’ll talk about the best brick stain colors for 2022 and how to decide if painting or staining your brick is the best option for your Sacramento area home. 

When you pull into your driveway after a long day’s work, you should love the way your home looks. Curb appeal counts for a lot. You would be pleasantly surprised at how finding the right hue of stain or color of paint for your exterior brick can update and modernize your home.

The Best Sunroom Paint Colors

Should You Choose Brick Paint or Brick Stain? 

Many homeowners aren’t aware that they have the option to stain their brick or don’t know what the difference is between brick paint and brick stain. Simply put, when you choose a brick stain, it essentially becomes 

part of the brick and offers greater longevity than paint. Brick stain is a permanent surface finish. Once applied, this mineral product soaks into the brick making it impossible for the stain to ever pull away from the brick. While both staining and painting have the ability to brighten your exterior, each method may appeal to different homes for different reasons.

  • Brick Staining 

It’s important to note that brick stain doesn’t protect your brick. However, you can choose a stain that contains protective additives. Brick stain soaks into the pores of the brick but doesn’t allow moisture to become trapped beneath the surface. One drawback of stain is that it doesn’t do a good job of concealing damaged or repaired brick. Stain covers the brick surface with a thin layer of color that can either be clear or solid. 

  • Brick Painting 

Painting your brick can help accentuate the integrity of the brick’s texture while giving it a clean feel. Brick painting covers not only the surface of the brick but also the mortar. The biggest advantage of brick painting is that the paint hides brick flaws or imperfections. 

Staining Exterior Brick 

So, how do you know if your brick is in the proper condition to be stained? Well, brick stain works the best when applied to a porous surface. If your brick has previously been treated, sealed, or painted, the stain will not adhere properly. 

You can test your brick for sealant by using a very easy technique. Flick a few drops of water on your brick. If the water is immediately soaked into the brick, this means there is no sealant. If the water beads up on the brick, it probably has some sort of sealant or clear coat covering its surface.

Removing Sealant from Exterior Brick 

You’ll need to completely remove sealant from your brick before staining. Otherwise, the stain won’t properly penetrate the brick. With a power washer, spray down your brick on a wide spray. This will help remove the sealant without damaging the integrity of your brick. Once dry, test again for sealant before moving forward. 

Best Porch Paint Color Ideas

Types of Brick Stain 

It’s very important to know what kind of brick you will be staining to purchase the proper kind of stain. Water-based stains are easy to apply and dry quickly. Oil-based stain requires a primer first and are more difficult to apply. Keep in mind that when staining a vertical surface, mineral and acrylic stains are always the most appropriate. Horizontal surfaces do much better with acid staining. 

How to Choose a Brick Stain Color 

Don’t let choosing a brick stain color overwhelm you. Yes, there are countless color options but that only ensures you have a better chance of finding that perfect color. The first thing to consider is whether you want to go with a semi-transparent or a solid stain. If you already like the overall look of your brick but simply want a different color, go with semi-transparent. On the other hand, if you want to create more drastic change, choosing a solid stain is what you’re looking for. 

Sometimes the best way to discover the brick stain color for your home is by checking out the homes around your area. Before making your decision, take the time to leisurely drive through nearby neighborhoods, taking notes of your likes and dislikes. 

Best Brick Stain Colors 

Exterior color painting trends come and go. So, we’ve done our research and have come up with the most popular brick stain colors of 2022.

  • Charcoal Stain-Going darker is very popular this season. Charcoal adds a deep richness to your exterior and always pairs well with the contrast of bright white or black trim. 
  • Terracotta Stain- Terracotta stain can turn faded and outdated brick to a more current and vibrant tone. For example, adding terracotta stain to faded red brick revitalizes the color to a brighter red. 
  • Sky-Blue Stain- It’s no secret that the color blue is an extremely popular color choice for both interior and exterior decorating alike. Blue adds a serenity and calmness we can all benefit from. 
  • White Stain- White is classic and ensures your home will never appear out of style. From modern farmhouse to contemporary, white stain reigns supreme. 
  • Red Stain- Red brick lends an heir of sophistication and tradition to any home. Although it is sometimes associated with older homes, the colonial and vintage looks are all the current rage. 

Is Brick Staining Permanent? 

People frequently wonder if brick wall stain color is permanent. While it is considered permanent, that doesn’t mean it isn’t changeable. Brick is able to have the color changed several times with staining. This holds true even if you’re going from a dark to a lighter color. 

Stain penetrates brick surfaces and is not only permanent but also maintenance-free. Brick stain absorbs into the stone and still allows the surface to breathe naturally. Staining results in a consistent finish that boasts an entirely natural look. 

Worst Brick Stain Colors 

It may sound cheesy, but there really aren’t any horrible brick stain colors. Typically, when you come across a brick color that isn’t aesthetically pleasing, it usually has more to do with the mismatching of brick paired with house color than the brick hue itself. However, no matter what you do to prevent it, brick stains will fade a minimal amount over time. Consequently, staining your brick with dramatic, dark colors may be something to avoid. Black brick will show the fading more prominently than white or gray. For this reason, white brick is one of the most classic and timeless brick color choices today. 

Paint Colors For Indirect Lighting

Where to Buy Brick Stain in Sacramento and Surrounding Areas

Quality brick stain isn’t hard to come by if you know where to look. There are several trusted and convenient retailers in the Sacramento area where you can purchase a wide variety of stains. To make it extra convenient, we’ve listed a few below: 

Dixon Ace Hardware 

1505 N. 1st St. 

Dixon, CA 95620 

707-678-5521 

Trico Painting 

8417 Washington Blvd #105 

Roseville, CA 95678 

916-550-9648 

Berco Building and Landscape Supplies 

1091 White Rock Rd #200 

El Dorado Hills, CA 95762 

916-933-3333 

Lowe’s Home Improvement Store 

3645 East Hammer Lane 

Stockton, CA 95212 

209-956-7200 

Brick Stain Colors for Interior and Exteriors Conclusion

If you have questions about whether you should paint or stain your exterior brick in Sacramento, give PaintRite Pros a call. Our experienced team of professionals can help answer any questions you may have Or if taking on this kind of a project is more than you want to handle on your own, we are more than happy to take over. From deciding which color you prefer all the way to the clean-up, we do only our best work every step of the way. Don’t hesitate to contact us for a free estimate today! If you live in the Sacramento area and need help with your painting project, we can help you! Click below to get your free paint estimate.

Free Estimate

Best Paint Supply Stores

Is Acrylic Base Coat Water Based? 

Posted on: May 11th, 2022

Is Acrylic Base Coat Water Based? 

Given the fact that not all paints are created equal, people often wonder if acrylic base coats are water-based? Because materials react differently on different surfaces and in various conditions, it’s really important to understand the difference between water-based, oil-based, and acrylic paint. You might assume that choosing the right color of paint for your project is the first step to take when starting a project. However, choosing the right type of paint for your needs should be the first thing to consider.

Is Acrylic Base Coat Water Based? 

Acrylic paint is water-based, adheres extremely well, and is very durable. It sticks so well that it can be applied to almost any surface. Every professional painter can attest as this paint sticks to their fingers for several days if nitrite gloves aren’t worn. 

Best Sacramento Paint Supply Stores

Is Acrylic Paint Latex? 

Acrylic paint is not the same as latex. The main difference between acrylic and latex paint is that while they are both water-based, acrylic paint contains chemicals. The chemicals in acrylic paint allow it to expand and contract with the changing temperature and weather. This quality makes acrylic an excellent paint for exterior projects. 

Acrylic paint comes in many varieties such as: 

  • Acrylic Latex 
  • Acrylic Latex Enamel 
  • Acrylic Enamel 

Is Latex Paint Water Based? 

Water-based paint is also referred to as latex paint and is the most commonly used among homeowners. This type of paint is great when painting your ceilings, walls, and doors and is known for being environmentally friendly. It’s less toxic and easier to clean up than oil-based paints. Typically, latex paints are less expensive which is always a plus. 

How Long Should you Wait Between Coats of Paint?

When to Choose Oil-Based Paint 

Oil-based paints are an excellent choice when working with surfaces like trim and cabinets. They form a harder and longer-lasting coating than most latex paints. Trim and baseboards can take a lot of abuse so consider oil-based paint for your high-traffic areas.

Is Acrylic Paint Good to Use in California? 

Due to the salty air and high exposure to UV rays throughout the year, California homeowners are advised to apply a fresh coat of exterior paint to their homes on a regular basis in order to extend its lifespan. Depending on the quality of your paint, it’s a good idea to paint your exterior every 5-10 years. 

When to Use Acrylic Paint 

Acrylic paint is known for being durable and long-lasting. It’s best used on wood and aluminum siding, stucco, drywall, plaster, and porch floors. Some of the most durable paints for exterior application, acrylics form an excellent bond to masonry and cement surfaces. 

It’s commonly recommended for professional painters to use acrylic paint for exterior surfaces. Its versatility and ease of application are just two of the major benefits of acrylic. 

When Not to Use Acrylic Paint 

Because acrylic paint is water-based, it’s usually non-toxic. But some versions do contain toxic ingredients or even carcinogens. With that said, acrylic paint can release harmful fumes as the paint dries. Additionally, acrylic paints that contain toxic ingredients usually have to be labeled with a warning but regulations aren’t the same in all countries. The common contents used to make acrylic paint are not the most environmentally friendly. They include heavy metals such as toluene, styrene, xylene, monomer, etc. If harmful metals are present in your paint, air-brushing may be particularly dangerous. 

With acrylic paint being extremely glossy, it isn’t always the best option for surfaces such as ceilings and interior walls. The high glossy factor can often be too shiny and distracting. While very durable, the high sheen will regretfully point out any flaw or imperfection on the surface it’s painted on.

Conclusion: Is Acrylic Base Coat Water Based? 

If you live in the Sacramento-Elk Grove area and have painting questions of any kind, contact PaintRite Pros. We are a family-owned business with years of professional experience. Our team loves what we do and it shows in the high-quality results we produce. We serve the entire Sacramento area including Dixon, Roseville, El Dorado County, Woodland, and Stockton

Free Estimate

Can You Paint Apartment Walls in California?

Best Home Paint Supply Stores in Sacramento for DIY Projects

Posted on: April 25th, 2022

Best Home Paint Supply Stores in Sacramento

Deciding what store to purchase your paint from before starting a project can actually have a lot of impact on ensuring your best overall results. Paint stores don’t just offer color and finish paint choices but can be an excellent source of expert advice. Employees can assist you in finding the best paint and tools for your unique project. With the best selections of top-quality products and reputable paints, superior paint stores have a lot to offer. 

Even if you have to drive a little further to a store out of your way, it may be well worth your time. It’s easy to make costly mistakes with a DIY project so to be able to avoid some typical pitfalls and mistakes right out of the gate is really important. 

We’ve compiled a list of the best paint stores in the Sacramento area to help you have an overall positive experience no matter what project you have in mind. 

1. Sherwin Williams

Phone: 916-452-2461

3300 Folsom Blvd, 916-452-2461 

Sacramento, CA 95816 

Sherwin Williams Paint Store of Sacramento is known for its variety of concrete and wood stains, exceptional quality interior and exterior paints and painting supplies as well as a friendly and knowledgeable staff.

2. Dunn Edwards Paint Store

Phone: 916-829-7572

6770 Folsom Blvd. 916-829-7572 

Sacramento, CA 95819 

Dunn-Edwards has been the leading paint manufacturer in the Southwestern United States since 1925 and are committed to providing the superior products and services that customers have come to expect.

3. PPG Paint Store

Phone: 916-929-2758

2513 Arden Way 916-929-2758 

Sacramento, CA 95825 

This Sacramento store location offers excellent products and pro-level expertise for all your painting projects. 

4. Warehouse Paint

Phone: 916-452-2222 

4150 Power Inn Rd. 916-452-2222 

Sacramento, CA 95826

From residential repaints to custom cabinetry, the team at Warehouse Paint can assist you every step of the way. 

5. Sherwin Williams Paint Store

Phone: 916-399-5870

7135 S. land Park Dr. #101 

Sacramento, CA 95831 

This Sherwin Williams Paint Store location offers high-quality paints, stains, and supplies to bring your ideas to life. Have questions that need answers? Ask the team at Sherwin Williams. 

6. Jerry’s Paint and Supply Inc

Phone: 916-483-4661 

3358 Fulton Ave. 

Sacramento, CA 95821 

Jerry’s Paint and Supply store strives to deliver the service and quality their customers need to support and ensure their success. 

7. Kelly-Moore Paints

Phone: 916-731-5809

6800 Folsom Blvd.  

Sacramento, CA 95819 

At Kelly-Moore Paints, you’ll discover that excellent service combined with quality products are a winning combo for any painting project you hope to tackle. 

8. Sherwin Williams Commercial Paint Store

Phone: 916-419-0805

1200 Del Paso Rd. Ste 120

Sacramento, CA 95834 

Sherwin Williams Commercial Paint Store of Sacramento supplies professional customers and contractors in business to business and industrial sectors with exceptional paint and equipment. 

9. FinishMaster, Inc.

Phone: 916-452-5738 

1427 N. Market Blvd #2 

Sacramento, CA 

At FinishMaster, their goal is to be a key factor in your success which is why they provide the support and tools you and your business need to thrive. 

10. PPG Paint Services

Phone: 916-739-8035

2828 Q St.  

Sacramento, CA 95816

Find what you need for your next project from the variety of paints, stains, and supplies offered at PPG Paint Services. 

Conclusion 

Anyone who’s tried their hand at painting knows just how important it is to use good quality products and supplies. Your projects will run smoother and go faster when you not only have the best tools but have access to expert advice. Each of the paint stores mentioned above has demonstrated superior customer service and has left its customers with an excellent overall experience. 

If you have painting questions and are located in the Sacramento-Elk Grove area, reach out to PaintRite Pros. We are the leading painting professionals when it comes to interior and exterior painting, cabinet painting, epoxy flooring, and more. Let us help your vision become your reality. We serve the entire Sacramento area including Dixon, Roseville, Stockton, and more. We also have Spanish speakers on staff!

How Much Does a Gallon of Paint Cover 

Posted on: April 12th, 2022

How Much Does A Gallon Of Paint Cover?

When you’re starting a painting project, one of the first questions people ask themselves is, “How much does a gallon of paint cover?” It can be extremely frustrating to be nearly finished with painting a room, only to discover you don’t have enough paint. You’ll have to stop in the middle of your project, run to the store, and keep your fingers crossed that they can match the paint as closely as possible. On the other hand, you don’t want to purchase too much paint. It’s expensive and a pain to store. In this article, we’ll go over the exact calculations to help ensure you purchase the appropriate amount of paint as well as some other tricks to make your painting projects simple and successful. 

If you live in the Sacramento area, we serve the entire area including Dixon, Roseville, Stockton, Woodland, El Dorado County, and more. Contact us for a free quote.

How Long Should you Wait Between Coats of Paint?

How many square feet does a gallon of paint cover? 

On average, you can get about 400 square feet out of one gallon of paint. For an easy perspective, one gallon would likely cover a bathroom or small bedroom. But keep in mind that most rooms require more than one coat of paint. So if your room needs 2 coats, plan on getting around 200 square feet out of a gallon. Two gallons would allow for two coats of coverage over roughly 800 square feet. Most people will commonly buy this amount as it covers common-sized spaces like a living room or larger bedroom.

How to calculate how much paint to buy 

Calculating how many gallons of paint to buy for your next project doesn’t have to be overwhelming. By following some basic elementary math you can figure it out in no time. Here are some simple steps to help calculate the proper amount you’ll need: 

  • First, multiply the width times the height of each wall in the space you will be painting. Now you’ve got your square footage figured out
  • Then, calculate the square footage of each door, window, or other wall cutouts you won’t be painting. Deduct this total from the total square footage of your walls
  • Next, do the same calculations for your ceilings and trim. Deduct this number from the total square footage and you should be good to go. When calculating how much paint you’ll need to buy for a project, it’s wise to always round up. However, if rounding up means you’ll be purchasing an extra gallon when you’ll need less than half, consider buying an extra quart instead. It’s always nice to have a little paint left over for touch-ups down the road but don’t waste money on overbuying.

What tools should you use? 

Believe it or not, using the right tools when painting can make the amount of paint you have stretch much further. Most stores provide several different options when it comes to rollers and brushes. Avoid choosing the cheapest ones as they don’t always allow for the best coverage and best-looking results. We have found that using a 9 in. roller with a ⅜-inch nap works the best on smooth walls. When working with textured walls, we recommend a ½-inch nap. 

Painted Textured Wall

Is it different for textured walls? 

It’s important to consider what kind of walls you’ll be painting when calculating how much to buy. For example, textured walls have more surface area which means they’ll require more paint. Surfaces such as stucco, popcorn ceilings, and brick may require more than 2 coats. Using a primer may also be a smart way to go. Using a primer may eliminate the need for several coats of paint but will cost money to purchase and may take extra time. When in doubt, we recommend priming first. Also when painting walls in an older home, you may need to plan on more than two coats. Walls that haven’t been painted for several years may need extra coats for the best coverage. 

Should You Prime Before Painting?

What about drywall? 

Fresh drywall is an extremely porous surface and will tend to soak up quite a bit of paint. We recommend priming drywall with at least two coats of quality primer before you start painting. So, if you’re replacing drywall after a water leak or working on walls that have been recently renovated, plan on applying an extra coat or two or primer for best results. 

Do you need more paint for a big color change? 

If you’re going to make a dramatic color change such as dark green to light tan, it’s typically going to require extra coats of paint. Using a primer is once again a good idea in this situation. It may save you from applying several coats of tan to completely cover the green. 

How Much Does a Gallon of Paint Cover Conclusion 

Knowing that one gallon of paint covers roughly 400 square feet will hopefully be beneficial the next time you’re faced with a painting project.

But if you live in the Sacramento area and would prefer to leave the painting to the professionals, PaintRite Pros has you covered. We offer a variety of high-quality painting services including exterior house painting, garage floor epoxy, commercial painting, interior and ceiling painting, and more. Contact us for a free estimate today!

Get Free Estimate

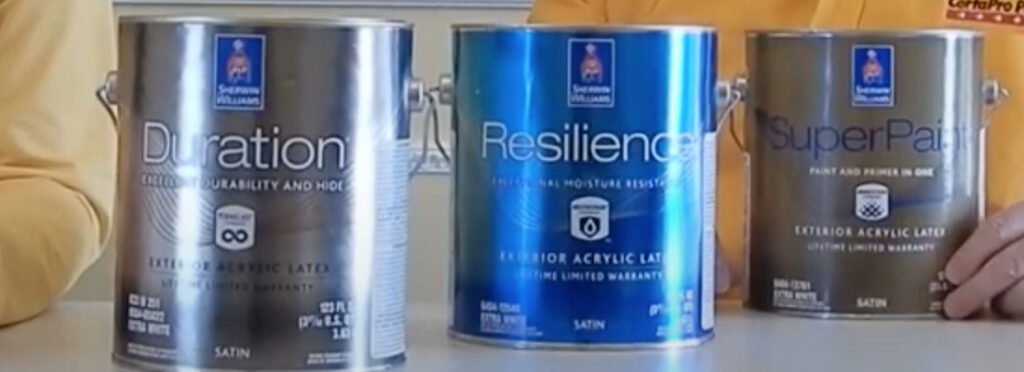
Resilience vs Duration vs SuperPaint: Which Is Best?

Resilience Paint vs Duration vs SuperPaint: Which is Best?

Posted on: February 7th, 2022

Resilience vs Duration vs SuperPaint

So you’re painting your home, but you don’t know if you should use Resilience paint or another of Sherwin Williams’ high-quality paints. We get it. Painting can be expensive, and you want to make sure you choose paint that will last. Resilience, Duration, and SuperPaint are all considered premium paints, so the paint that is best for you will depend on your project.

Are you painting your exterior? Updating your porch? Refreshing your kitchen? Or painting the whole house, top to bottom? Whatever your project, check out our guide to see whether Resilience paint, Duration, or SuperPaint by Sherwin Williams are right for you. 

How Long Does It Take for Paint To Dry?

Sherwin Williams Resilience vs Duration Paint

Both Resilience paint and Duration are high-quality products by Sherwin Williams, so what’s the difference between the two? Each paint has different qualities that will make it better for your needs depending on your project.

Resilience Paint

One of the best attributes of Resilience paint is how quickly it’s ready to withstand the weather. For most paints, you need at least four hours of drying time before it’s safe from rain and moisture. This can mean a project has to be delayed because there isn’t enough time for the paint to dry before a storm comes. Resilience paint, on the other hand, only needs two hours before it’s ready. Using MoistureGuard technology, Resilience paint resists mold and mildew. That means picking a day to paint is easier, with fewer concerns about the weather. You can also start a project later in the day and not worry about evening moisture.

Aside from its resistance to mold and mildew, Resilience paint is a durable, exterior paint. In fact, it’s backed by a lifetime limited warranty (as long as it’s applied correctly). Resilience covers dark colors well and is easy to apply. The paint flows and levels for a smooth appearance. For exteriors that are already painted, you’ll need just two coats of paint. However, for unpainted surfaces, you will need a primer. Resilience paint works for aluminum/vinyl siding, wood siding, clapboards, shakes, shingles, plywood, masonry, and metal. If you’re painting vinyl siding, Resilience is available in 100 vinyl safe colors.

Resilience Paint Use

One thing to note about Resilience paint is that it is meant exclusively for exterior painting. After all, rainstorms and morning dew aren’t a concern when painting interiors. Still, Resilience has low VOC, and if you’re painting the outside of your home, Resilience is a great product to use.

Resilience is offered in the following sheens:

  • Flat
  • Satin
  • Gloss

Duration Paint

Unlike Resilience paint, Duration does offer both exterior and interior versions. Although it doesn’t dry as quickly as Resilience paint, Duration does have anti-microbial technology that slows the growth of mold and mildew. 

Probably the biggest difference between Duration and Resilience is how thick Duration is. The paint layer is 70 percent thicker than other exterior paint. This can make Duration more difficult to apply. However, it’s also part of what makes Duration paint so durable. According to Sherwin Williams, you only need one coat of Duration and no primer when applying to a pre-painted surface. Duration also comes with a lifetime limited warranty. 

Duration works really well for heavily trafficked areas inside your home. It hides pre-existing stains and resists the formations of new stains. Whether it’s a bathroom or playroom, Duration lasts long and doesn’t fade. In its exterior variety, it holds up against color fading, cracking, and flaking.

Duration is offered in the following sheens: 

  • Flat
  • Satin
  • Gloss
  • Low lustre
  • Matte
  • Semi-gloss

Comparing the Two

Both Resilience and Duration are really good paints. Choosing which one you want depends on your project. If weather is a concern, go with Resilience, which will dry in time to avoid moisture concerns. If you’re looking for an extremely durable product, Duration may be the better choice. 

Another factor to consider is price. Resilience paint costs less per gallon than Duration. If you’re planning to move in a few years, Resilience might be the better choice to help you save money. 

Sherwin Williams Resilience vs SuperPaint

Just like Resilience paint and Duration, SuperPaint is high-quality paint. But how does it compare to Resilience? 

SuperPaint

SuperPaint is a durable paint that resists dirt and mildew and lasts in extreme weather conditions. It can be applied down to 35 degrees F and is considered a self-priming paint. Like Duration, SuperPaint can be formulated indoors or outdoors. 

SuperPaint comes with a warranty, but it isn’t a lifetime warranty like Resilience paint has. It has a high degree of breathability, so SuperPaint is great for painting old houses that have a lot of layers of paint. 

SuperPaint comes in the following sheens:

  • Flat
  • Low lustre
  • Satin 
  • Gloss 
  • High Gloss

Comparing Resilience to SuperPaint

Both SuperPaint and Resilience come in 100 vinyl safe colors. Previously, homeowners were limited to only light shades for vinyl, since dark shades attract heat, which could damage the vinyl. Sherwin Williams’ vinyl safe colors protect the vinyl from this kind of damage, meaning more color options for you. 

Another trait Resilience and SuperPaint have in common is low VOCs, meaning they give off fewer gasses that are harmful to the environment. 

One of the differences between the two is that SuperPaint is self-priming, while Resilience paint is not. If you’re looking to save time on a project, you might save time with SuperPaint. On the other hand, if you want more durable paint, you’re probably better off with Resilience paint. 

Sherwin Williams Duration vs SuperPaint

Both Duration and SuperPaint have interior and exterior options, so you might be wondering how they are different. SuperPaint is less expensive, and that’s because it isn’t quite as durable as Duration paint. SuperPaint comes with a 15-year warranty, whereas Duration comes with a lifetime limited warranty. 

Duration is a thicker coating than SuperPaint. It’s more expensive, but also much more durable. Because it’s so thick, it has less breathability, which may be a concern if painting over many layers of paint. In that case, SuperPaint is more breathable and may be better for an older home. 

Sherwin Williams Resilience Reviews

One of the best ways to see if a product is right for you is to look at what the customers are saying about it. Here are some Resilience paint reviews from customers.

Tiffany from Painting by Tiffany says, “this is our go-to exterior paint. We always receive calls for exterior entry door repaints and we have had nothing but success with Resilience.

Another happy customer, Andrew, says he’s used Resilience on his own house and that “It withstands the Texas heat well.”

Blake says that, “this paint does a very good job of covering primed LP Smart trim with 1 coat. I would highly recommend it to anyone painting wood on the exterior of your home.”

Conclusion

If you’re ready to paint your home, but you don’t want to do it alone, call PaintRite Pros for a free estimate! We’re the top painters in Elk Grove and would love to upgrade your home with a hassle-free paint job. We even serve the entire Sacramento area including Arden-Arcade, Laguna, El Dorado County, and more! Y hablamos Espanol!

How Long Does Paint Last? 

The Top Porch Paint Color Ideas

Posted on: January 18th, 2022

Top Front Porch Paint Color Ideas

If you want to makeover your home’s exterior, one of the easiest things you can do is paint your front porch. Since deciding how to update your porch can be challenging, we’ve compiled a list of our top front porch paint ideas

Your front porch is an extension of your living space, whether it is a place to sit back and relax or to socialize with neighbors. Updating or changing the color can make it a more inviting space where you will want to spend your time.

Read on to see what you can do to update your porch.  

How Long Does It Take for Paint To Dry?

Front Porch Paint Color Ideas

Picking the color of your front porch might be one of the most difficult parts of the entire process. The color is something that you will have to look at every day, so you want to make sure the color is one you love. Need some color inspiration? Check out our paint color ideas for updating and revitalizing your front porch.

White

When you think of porches, the first color that probably comes to your mind is white. White is a classic color for your front porch. It adds a light, airy feeling to your exterior and never goes out of style. White works well with many different porch styles, from modern farmhouse to classic plantation. White paint will also help brighten a south-facing porch that doesn’t receive as much sunlight. Pops of color stand out more vibrantly against white. 

Pure White by Sherwin Williams is a classic shade of white, perfect for your porch. If you like the idea of white but want something with a little more warmth to it, you can look for something off-white, like Farrow & Ball’s Shaded White.

Gray

Grays have been having their moment in home design recently, and that trend is here to stay. Whether you go with a warmer or cooler gray, you will not be disappointed in the neutral but elegant look of your front porch. 

For a calming blue-gray, choose a color like Behr’s Light Drizzle. If you prefer a silvery gray, Silver Mine will give your porch a sleek look that will enhance the architectural details of your front porch. Benjamin Moore’s Revere Pewter is a highly popular warmer shade of gray. 

Green

White and gray both offer sleek, classic looks for your front porch, but if you want something with a little more pizzazz, consider playing with green. Greens are trending, and we love the way they can flatter the landscaping of your house. You can either paint accents, like shutters and doors or go big and paint the whole porch green.

If you like the idea of a green porch, consider Benjamin Moore’s Backwoods for a classic, vibrant color. For a more muted hue, Tree Moss is a beautiful shade of sage that will still accentuate the greenery surrounding your home.

Navy Blue

Navy blue is a moody hue that is always a classic paint color for front porches. Navy blue acts as a neutral color but still manages to make your front porch pop. 

Farrow & Ball’s Inchyra Blue is a gorgeous color that, depending on the light, reads more gray, blue, or green. Newburyport Blue by Benjamin Moore is a classic color of navy blue steeped in colonial tradition. 

Seafoam Green

If you’re looking for something a little bit whimsical, consider painting your porch seafoam green. You can use it as an accent color on doors and shutters, or even on the whole porch.

Behr’s Seafoam Pearl is a gorgeous bright color of seafoam green. If you want something lighter, Snowbound and Sparkling Brook offer softer versions of the color.    

What’s The Best Temperature To Paint Outside?

How to Paint a Porch

Now that you have an idea of how you want to update your porch, here are our best tips for painting your front porch.

1. Pick Your Paint Color

Before you get to work, you will have to pick out your paint color. You may want to buy some samples so you can see which color will work best for your porch. Make sure you like the way the paint color reads in different lights, and consider how it will look in context with the neighboring houses. Also, consider whether or not it clashes with your porch furniture or with other parts of your house’s exterior.

Make sure you choose the right kind of paint for your project. For example, if you’re painting railings and posts, look for an exterior door and trim paint and pair it with an exterior latex primer. If the paint you buy does not come mixed with primer, make sure to buy a primer as well. 

2. Surface Preparation

It might not be the most exciting part of painting your porch, but preparing the surface is key to a good paint job. First, clear your porch of anything you keep there. Sweep dried leaves, twigs, and other debris off, and then wash the porch of dirt with your garden hose or a pressure washer. Make sure to get in between floorboards if you have a wood porch. You will want to wait at least 24 hours before painting to ensure your surface is dry.

A concrete surface can be cleaned with a mix of water and detergent. If your porch is already painted, you should clean the paint with a TSP solution. This helps remove grease and stains. Make sure you wear proper protection when using TSP. 

The last part of surface preparation involves sanding existing paint and rough edges. Make sure to dust and clean the surface again when you are done sanding. Once that is done, you can apply painter’s tape. 

3. Etch the Surface (For Concrete)

Skip this step if your flooring is wood. If, however, you are working with concrete that has not been painted, you will need to etch the surface. To do this, mix a solution of 5 to 10 percent muriatic acid and water. As with the TSP, use proper hand and eye protection. Plan on using a gallon of solution per 100 feet square feet, and scrub with a bristle brush to apply the muriatic acid solution.

Once you have applied the solution to the whole area, leave it on until it stops bubbling. Then, wash it off and let the whole area dry. It will leave behind a powder, which you can clean up with a rag and a shop vac.

4. Apply Primer

Now that the surface is prepared, it is time to apply the primer. If you have a wooden porch, use two layers of exterior primer. A roller brush with an extension pole will probably be the easiest on your back, but for hard-to-reach areas, use a small brush. 

If you have a concrete porch, you apply one layer of concrete primer, using the same method above. 

Allow eight hours for the primer to dry before moving onto the last step.

5. Paint

Once the primer is dry, you can begin painting your porch. Two coats of paint should give you the coverage you need. Use the roller brush with the extension pole again, along with a small brush for the trickier areas. 

Make sure to wait eight hours between coats of paint. When painting concrete stairs, mix clean, fine sand in with the paint. This leaves a rough surface that will not be slippery when wet. To keep bugs away, you can also mix citronella in with the paint.

Now that your porch is painted, wait at least two days before replacing the furniture or letting anyone walk on the porch. 

Porch Floor Paint Ideas

If you think your porch floor has to be basic and boring, think again. Consider some of these porch floor paint ideas to give your porch a facelift.

  • Stained Wood

While stained wood may be classic, it does not have to be boring. Staining the wood of your porch both protects the wood and gives it a beautiful, natural look. A dark stain like Dark Walnut by Minwax can elevate your porch, giving it a sleek, elegant look. Benjamin’s Maritime White is a lighter stain that will enhance the natural grain of your wood. 

  • Patterns

If you want something with a little more flair, consider painting a pattern on your porch floor. Checkerboard patterns, geometric shapes, and bold stripes are all classic looks that will dress up your porch. You can even go for a faux tile look. Whichever pattern you choose, begin with your base color and allow that to dry before using painter’s tape to mark out your patterns. 

  • Bold Color

Painting the floors of your porch with a bold color like red is an easy way to make a big impact on the look of your porch with minimal effort.

Best Porch Paint

Painting your porch takes a lot of effort, which means you want the most durable paint to stand up against the elements and foot traffic. Here are some of the best porch paints to use.

  • Kilz Porch & Patio Floor Paint: This latex paint is considered one of the best paints for your porch floors. The paint resists scuffs and cracks and protects against mold and mildew. It goes on smoothly, dries quickly, and cleans easily. That, plus its durability means Kilz Porch and Patio Floor Paint has a high customer satisfaction rating.
  • Rust-Oleum Porch & Floor Coating: Rust-Oleum is a highly trusted company with high-performing paints. Their porch and floor coating comes in a variety of finishes, including gloss, semi-gloss, and anti-skid. Like Kilz Porch & Patio Floor Paint, Rust-Oleum’s Porch & Floor Coating protects against mildew and is resistant to scuffs, cracks, and scratches. It dries quickly and goes on with a smooth finish.
  • Valspar Latex Satin Porch, Floor, & Patio Paint: Another competitor for best paint comes from Valspar. This porch and patio paint goes on smoothly and dries quickly. It is durable against weather, scratches, and general use and is tintable to most Valspar colors. 

Front Porch Paint Color Ideas Conclusion

Painting your own porch is something you are more than capable of doing, especially in the age of YouTube How-To videos. However, if you would rather leave it up to the pros, give the experts at PaintRite Pros a call or click here for your free estimate. We work in Elk Grove and Sacramento, and with over 25 years of experience and a 4.9 star rating on Google, we have the skills to paint your porch exactly how you want it. We have Spanish speakers on our staff and serve Dixon, Davis, Roseville, Vineyard, and more!

Get Free Estimate

How to Paint a Metal Garage Door 

Posted on: December 27th, 2021

Oftentimes, your garage door is one of the first things people see when they pull up to your home. But when it starts showing signs of wear and tear, people wonder just how to paint a metal garage door and if that is even an option. While painting a metal garage door requires some time and effort, it can certainly be done and is a fairly simple way to increase your home’s curb appeal and potentially give it a whole new look. If you live in the Sacramento area and would like help, click here to get your free estimate

Do I Have To Prime Before Painting?

Can You Paint a Metal Garage Door? 

Now that we know that you can in fact paint a metal garage door, let’s look at some of the do’s and don’t to ensure your hard work gives you great results. 

Some new garage doors come already primed. This is nice because they already did the first step for you. Now it’s just a matter of applying garage door paint or paint designed for metal, on top of the primer. Keep in mind that if you purchase a new garage door and it’s been galvanized, metal paint won’t adhere to it! You’ll be left with a peeling mess after a few days. We recommend not painting galvanized doors. So today we’ll be focusing on pre-primed metal garage doors or metal doors that have been previously painted. 

Best Paint for Garage Door 

Acrylic latex exterior house paint is generally your best choice for metal garage doors. But don’t make the mistake of purchasing cheap paint. You won’t regret paying a little more for a paint that will look better longer. It may even save you money in the long run because you won’t need to apply several coats. 

In most cases, one coat of metal garage door paint is all it takes. However, use your judgment after the first coat and move forward from there. You may need a second coat if you’re painting a light color over a darker shade. 

The best paint finish for your garage door is gloss or semi-gloss. Because these finishes dry hard, they protect your paint from scratches and scuffs. Glossy paint also holds up very well in humid or wet climates and wipes down easily for very low maintenance. A satin finish is also a good option. Below is a list of the best paints for aluminum or steel garage doors: 

  • Everlast Exterior Paint from Lowe’s 
  • Behr Ultra Exterior 
  • Zinsser Perma-White Rust-Oleum 
  • The Montage Signature Paint 
  • Diamond Brite All-Purpose Enamel 
  • Rust-Oleum 8781502 when painting galvanized metal

Best Primer for Metal Garage Door 

Rust is the biggest enemy of metal. A garage door showing signs of rust can be unsightly. There are a number of primers on the market that are designed to prevent rusting and corrosion. We highly recommend using a high-quality bonding primer for best results. Here are a few primer options that have proven successful: 

  • Kitz Adhesion Bonding Primer 
  • Gempler’s Eco-friendly Rust Converter and Primer 
  • Rust-Oleum Clean Metal Primer 
  • Corroseal Water-Based Rust Converter Metal Primer

Choosing a Color 

With the thousands of paint colors out there, narrowing it down to just one can be tricky. You may want to choose a color that is similar to the color your door was previously painted. But, if you’re looking for a change, be sure you pick a color that goes well with your siding, trim, and any brick, stucco, or rock accents you have. Most people lean toward neutrals such as grey, tan, white, or beige. Just be sure you’ve thought it through and love your choice. 

How to Paint a Metal Garage Door 

With a little guidance, you can paint your garage doors in a weekend. Following these simple steps can help your project flow smoothly and ensure the best results.

Step 1 Consider the Weather 

It’s a good idea to check the weather forecast a week in advance. You’ll want to paint on a day that is not too hot and not too cold or wet. Paint may not dry properly in extreme temperatures. The ideal temperature for painting is between 50 and 75 degrees. 

If you choose to prime and paint with a sprayer, make sure there isn’t much wind. Not only is wind frustrating to work in but most of your paint won’t reach its destination. 

Step 2 Clean Metal Doors and Frame 

Thoroughly wipe down metal doors and frames with soapy water. Remove all stains, rust, and grease from your doors and dry with a clean rag. Make sure all dust and residue are completely removed.

Step 3 Preparation 

  • If you’re painting over old paint, light sanding is necessary, making sure all flaking paint is removed. Wipe down so no dust or debris remains from the sanding process. 
  • Use heavy-duty painter’s tape to mask off areas you don’t want to be painted. This includes windows locks, trim, and the edges of your garage. It may be a good idea to lay a tarp down onto your driveway and garage interior to protect from overspray as well. 
  • For easy maneuvering, disengage your garage door mechanism so you can open your door manually. 

Step 4 Priming 

Using a paint sprayer or quality roller, apply your primer of choice. A sprayer is a much quicker option but a roller works just fine. Once finished, open your garage door partially so your panels won’t stick together. If your door has inset panels, prime these first. Allow several hours for your primer to fully dry. 

Step 5 Painting 

Apply quality exterior paint to your door. Bottom to the top, starting with the inner panels and working your way out. Survey your work. If it looks covered and meets your standards, consider yourself done. But, if you can see uneven patches or spots where the old paint is peeking through, opt for a second coat. Allow at least 12 hours of curing time in between coats. Once done, remove the tape and don’t open your door until it’s had time to dry overnight. 

How to Paint a Metal Garage Door Conclusion 

If you have any questions about painting metal garage doors or just don’t have the time to paint your door yourself, give PaintRite Pros a call. People live very busy lives and often prefer experts to take care of tasks they aren’t totally comfortable with. Our team of painting professionals will be happy to take care of all your painting needs for you. We have an excellent reputation across the entire Sacramento area because we love what we do and we want you to love it too. We have Spanish speakers if you prefer to speak in Espanol

Get Free Estimate

How Long Does It Take For Exterior Paint To Dry?

Professional

Painting Services

Have questions about your residential or commercial painting needs? Contact us online or give us a call at 916-667-8050 to request a free estimate appointment.

Call Now